
Styrene Astromech Builds
2021-07-03By: Oliver Steeples
Oliver Steeples
At the start of the R2 Builders Group the materials used to build droids were limited to aluminium or plywood, with aluminium or resin details. Around 2007 the groups founder Dave Everett released a set of flat pack styrene plans that would change the way droids are built and allow a budget option.

Styrene (HIPS, High Impact Polystyrene) is light, strong, and easy to work with. And until recently it was relatively low cost, however during COVID and recent times the relative cost of plywood, aluminium and styrene have all increased. Another benefit is you do not have to wait years for parts to become available, with motivation a styrene droid could be made in less than 6 months.
Dave’s plans are available in the blueprints section of Astromech.net and available to anyone who joins the forum. Once downloaded they can be printed at places such as plotgiant.co.uk and then glued/transferred to sheet styrene, before being cut out. While styrene can be cut using a ruler and knife, I recommend buying a router and using the body ring tool.pdf file, this allows for perfect circles every time, which is very important when making the body frame.
The Everett plans use a mixture of 3mm, 2mm, 1mm and 0.5mm for skinning. In the UK HIPs can be purchased from Eagle Plastics (club discount available) or Stephen Webster Plastics.


There are several improvements to the Everett styrene plans such as adding extra supports at the top of the legs and more supports on the shoulder plate inside the body, these all help increase the rigidity of the legs/body. I recommend reading the following thread as this contains a lot of advice and help on building a styrene droid.
Following the release of the Everett plans the number of styrene droids shot up due to the low cost option of building a droid and it became a major turning point in droid building.
After the Everett plans were released Frank Pirz and Ziz released alternatives.
Ziz took the Everett plans and made several improvements such as making a central channel down the legs rather than relying on a metal tube to route the motor wires. He also made them CS:R compatible so they are more accurate to the original films than the Everett plans. The downside of the Ziz plans is that they are all in jpg format so you need to be really careful when printing them to make sure you have the right scale.


Ziz’s plans are available here:
http://astromech.net/forums/showthread.php?29605-Ziz-flat-pack-thread-reference
The file repository above also contains plans for the R4, R5 and R6 heads along with dome drive gears.
Frank Pirz went in a different direction and initially came up with the eggcrate frame and has since released plans for multiple Astromech parts including a Swiss Army Knife middle foot that supports a single caster, multiple casters and omni-wheels. Frank’s plans use tabs to locate the various parts together, this increases the cutting complexity and is really limited to CNC cutting but greatly increases the ease of assembly.
Frank offers both the plans that are freely available from the link below, as well as CNC’d kits of the parts he produces.
http://www.r2d2.media-conversions.net/
One of the improvements that Frank did was to put struts across the shoulder plates, this increases rigidity and makes sure the shoulder plates are parallel to each other. On an Astromech the shoulders are a major stress point so it’s important to make these as strong as possible.
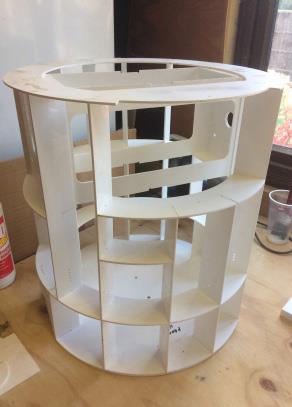

With any of the styrene builds once the parts are cut out they can be assembled with glue to form a strong monocoque structure. One of the main concerns with styrene is the strength, however once glued together the parts are very strong and can take quite a bit of abuse, but obviously not as strong as an aluminium or wooden droid. A tip is to add a bit of ink/paint to the glue, this allows you to see how much is being used, which is important on the skins as too much glue can cause the 1mm skins to warp.
Once the parts are glued together they will most likely need some type of filler on the gaps, 3M acrylic red or green putty are a good choice (red is a bit more rubbery than green). Once filled the parts can then be primed using a plastic primer, sanded back, a 2nd coat of primer, then the final coat on top.
The cost to build a budget Remote Control styrene droid starts at around £500 with a R4/5/6 head which can be built from flat styrene sheets, it rises to around £1500 to build an R2-D2 due to the dome and dome electronics, which are the most expensive components when building a droid.
R2 dome options include a 2 layer laser cut ABS dome or upgrading to a 2 layer laser cut aluminium dome which gives a better finish, but at extra cost. The details on the droid can be resin, 3D printed or even scratch built to further reduce the cost.


A variety of dome options exist including Dave Everett’s R5, Ziz’s R4/R6 and Michael Baddeley’s 3D printed R2 dome.


For the details such as the front vents, utility arms and ankle cylinders these can easily be 3D printed and then glued onto the styrene parts. As above you can also 3D print heads that can be used on a styrene body.
When the original Everett plans were released these used a Jaycar motor for drive, from personal experience these are a little underpowered and I’ve stripped several gearboxes. Later plans have been released what allow scooter motors to be used on the various styrene droids, or even brushless motors for more power and precise control.
If you are interested in how to build a Styrene droid then this video by Mark, Chris and Jamie.